bittbox의 Illustrator Tip 1
How to Make a Custom Illustrator Brush
커스텀 일러스트레이터 브러쉬 만들기
It would actually be pretty hard to make this tutorial any more detailed. Making custom Illustrator brushes couldn’t be easier. However, there are a couple things you do need to know first. There are 4 types of brushes that you can create in Illustrator. (Calligraphic, Art, Scatter, and Pattern) I will be showing you how to make an Art Brush. I haven’t explored the other 3 in as much detail, but as soon as I have I will post about it. For now, I will show you how to make an art brush, and you can experiment with the other brush types in the same fashion, the only differences are settings, and how the brushes act when applied.
커스텀 일러스트 브러쉬 만들기는 쉽지만은 않은 것이라, 이번 강좌에서 엄청 자세한 내용을 다루는건 좀 힘들구요...^^::그러나 여러분들이 우선 알아야 될것이 두개 있습니다. 일러스트에서 만들어 낼수 있는 브러쉬 타입은 총 4개죠 (캘리, 아트, 스캐터, 패턴) 전 아직 아트 브러쉬는 제외한 나머지 3개에 대해선 아주 자세히 해보질 않아서 일단 아트 브러쉬 만드는 법에 대해서 보여드리도록 하죠. ㅎ 조만간 올릴 예정임... 자 일단 보죠...

Make a Custom Illustrator Art Brush:
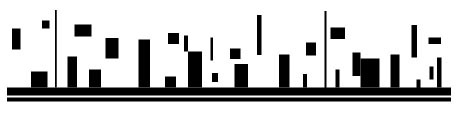
First, open a new Illustrator document and make any shape that your heart desires. You can literally make ANY shape into a brush, even a square if you feel like it. Here’s what I made. A couple of bars and some blocks scattered about. There is no need to worry about shapes at this point because once you try this a few times, you will get an idea of how the shapes will effect your brush.
일단은... 새로운 도큐먼트를 여시고 아무 모양이나 맘껏 만드세요. 말그대로 브러쉬로 사용할 아 무 거 나... ^^::
전 이렇게 두개의 선과 몇개의 검정 박스로 뭐 이런식으로 만들었습니다. 넘 걱정하지말고 편안하게 만들다보면 어떻게 만드는게 멋있는 브러쉬가 나올지 아이디어가 떠오르겠죠?
Now select all of the shapes that you want to be a brush and in your Brushes palette, click on the little arrow in the upper left, and select “New Brush.”
이제, 브러쉬 파레트안에 넣을 모양을 선택한 다음, 위 왼쪽에 작은 화살표를 클릭하고 뉴 브러쉬를 선택하세요.

You will get the option to choose 1 of 4 brush types. Choose “Art Brush” and click OK.
이어 나오는 4개의 옵션중 아트 브러쉬를 선택해 주세요.

Now you should be in the Brush Options. IMPORTANT: Make sure you select “Tints” as the Colorization Method. This allows you to change the color of the brush as a stroke color. If you don’t select Tints, your brush will always be the color it is when you create it. There are lots of other settings you can play with here, including the direction of the brush stroke. Choose your settings and click OK.
여기서 중요한데요, 옵션중 Colorization에서 Method를 Tints로 해야 된다는거... 그러지 않으면 만들고 나서 스트로크 컬러를 수정못하고
첨 만들어진 상태로 계속 써야 된다는... ㅎㄷㄷ

You should now see your new Custom Brush in the Brushes palette.
자 오케이 눌렸으면 아래처럼 브러쉬 파레트에 뉴 커스텀 브러쉬가 들어가 있는게 보이시나요??

Now create a shape to test your brush. I used a circle, like below:
이제 만들어진 브러쉬를 테스트 한번 해보죠... 전 아래처럼 동그라미를...

Now make sure you have the stroke selected in the tools palette, and click on your Custom Brush in the Brushes palette to apply it to the circle to see what you get:
이 동그라미를 선택한 다음 새롭게 만들어진 브로쉬 적용하는 건 다들 아시죠?? 모르시나요? ^^:: 별거 없습니다.
그럼 아래와 같은 모양이.. 오 디지털 느낌 나는데요..ㅎ

Custom Brushes are an easy way to get shapes that would have otherwise taken you hours to draw by hand. Now that you have your brush, you can start applying it whenever you want, and adjust the stroke size to get the effect/shapes you want. In the image below, all I did was use the same brush I just created, duplicated it, overlapped it, and adjusted scale, colors and stroke sizes. You can make multiple brushes in order to get way more complex, and the more you try it, the better you get. Seriously, this took about a minute with one brush (made from simple rectangles!). Imagine what you can do if you spend some time experimenting?
커스텀 브러쉬는 여러가지 멋진 모양을 만들어 내기 안성맞춤이죠, 이건 펜툴로 다 그린다고 생각하면 참 노가다죠? ㅎ
자 이제 여러분만의 브러쉬가 생겼으니 맘껏 사용해 보시고요. 스트로크 두께나 컬러 모양 등을 여러가지로 바꿔서 응용하면 정말 수많은 아트웍이 나올 것입니다. 아래 그림은 이렇게 만들어진 오브젝트를 복사, 오버랩, 크기, 컬러, 두께 등의 변화를 주어 만들어 낸 것입니다.

본 포스팅은 외국 블로그의 콘텐츠를 저희가 알기 쉽게 번역한 것임을 정중히 밝히는 바입니다. 오역의 소지가 있을 수 있으므로 원문과 같이 올려드립니다. 출처 - www.bittbox.com
'일러스트레이터 TIP' 카테고리의 다른 글
| 일러스트레이터에서 화살표 쉽게 만들기 (6) | 2009.09.07 |
|---|---|
| 일러스트레이터 글씨 3D효과 주기 (5) | 2009.09.02 |
| 일러스트레이터 패스따라 글씨쓰기 (8) | 2009.09.01 |
| 일러스트레이터 글씨에 그라데이션효과 적용하기 (2) | 2009.08.31 |
| 일러스트레이터를 이용한 광고속 타이포그래피 따라하기 (14) | 2009.08.06 |